Simply Love Mosaic Cushion Cover - Crochet Pattern
Picture this: a cosy corner of your home adorned with a beautiful crocheted cushion. Intrigued? Keep reading 😄.
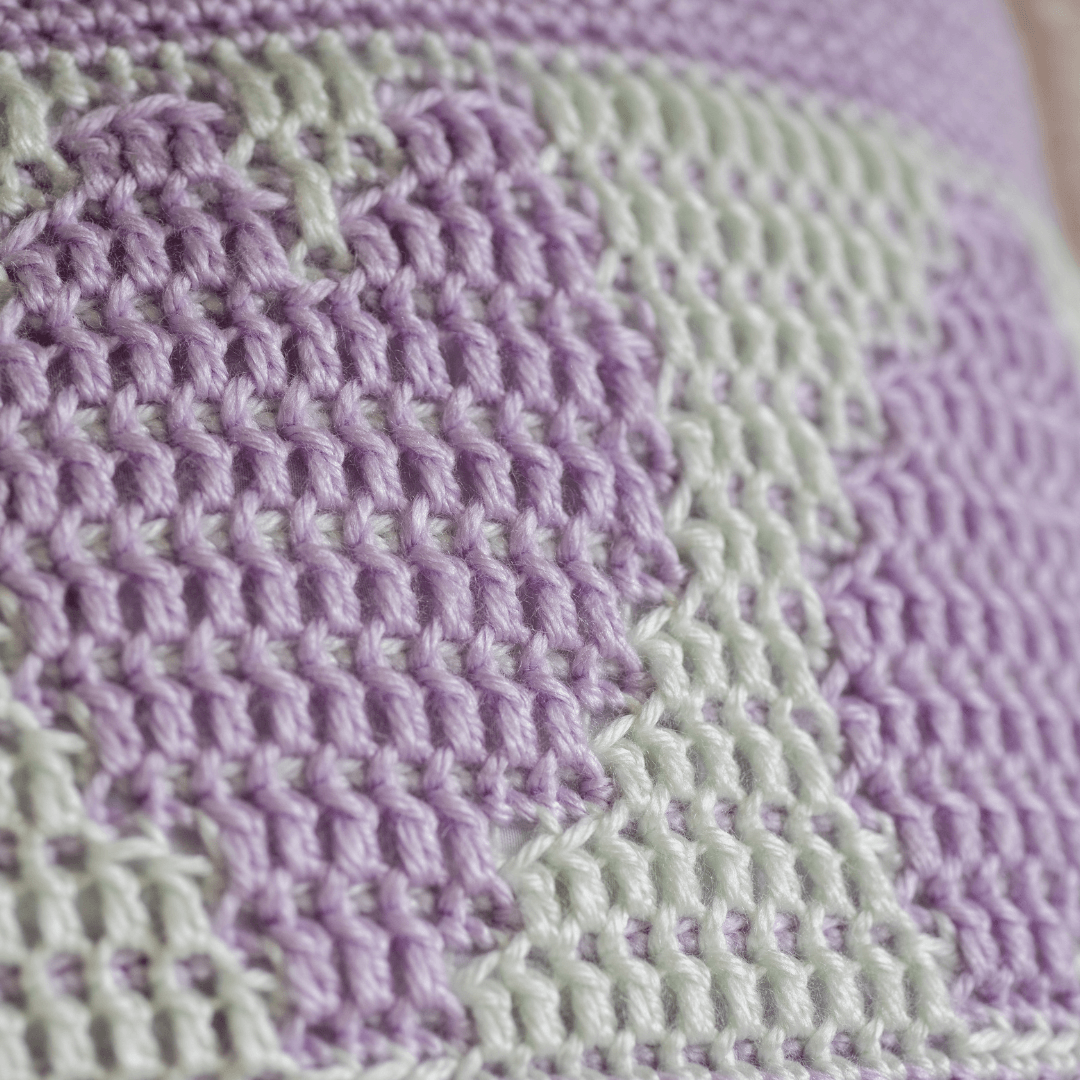
Imagine my delight when the lovely folks at Crochet Foundry extended an invitation to design a crochet pattern using their Furls products. Inspired to create something cosy-feeling yet beginner-friendly, with a dash of mosaic crochet thrown in, I settled on a cushion cover design. Why? Because every home deserves a touch of handmade warmth, and every beginner deserves a delightful adventure. With a motif that could look at home on any chair or sofa, I chose a symphony of three colors on one side, and two on the other. It's a housewarming gift waiting to be cherished.

***This page may include affiliate links - this means that I may earn a small commission if you purchase the product. This is at no additional cost to you. I will only recommend products that I have tried and tested myself, and that I like using. This income helps me to keep designing quality crochet patterns for you.***
They kindly allowed me to select a Taurus Streamline Zodiac hook - this hook features mesmerising purple hues (I love purple!). Crafted with love and unique in its own right, this resin hook’s chunky handle provided me with comfort whilst crocheting, gliding smoothly along the yarn.
Speaking of yarn, the ‘Tranquil’ Wander Palette Pack they sent was wonderful. Five glorious colours that worked beautifully together. And bonus - guess what accompanied this yarny goodness? A charming tote bag! As I used the yarn, I discovered that it has a silky feel and a gentle sheen - it was a pleasure to work with.
Apprehensive about trying mosaic crochet? I promise you that it is entirely beginner-friendly! It’s probably the easiest colourwork technique, and is therefore perfect to start with. The overlay mosaic crochet technique only requires you to use a single colour at a time - so no tangled bobbins to worry about. There are even fun techniques that can be used to hide all of your ends - no more weaving them in. What is not to love?
Our Citrouille Pumpkin Baby Blanket uses this mosaic crochet technique too!

No time to crochet it right now? Why not pin the image above so that you can easily come back to it later.
Need a crochet pattern reading refresher? Why not sign up to our 5 day pattern reading challenge below, or click HERE to learn more.
This pattern is available on Ravelry, and LoveCrafts.
The benefits of purchasing the premium PDF include:
Ad-free
Professionally formatted
Printable PDF
Available offline
Unlimited pattern support
If you love crocheting cushion covers you might also love our Aphrodite Cushion Cover too - click on the photo to learn more 😀.

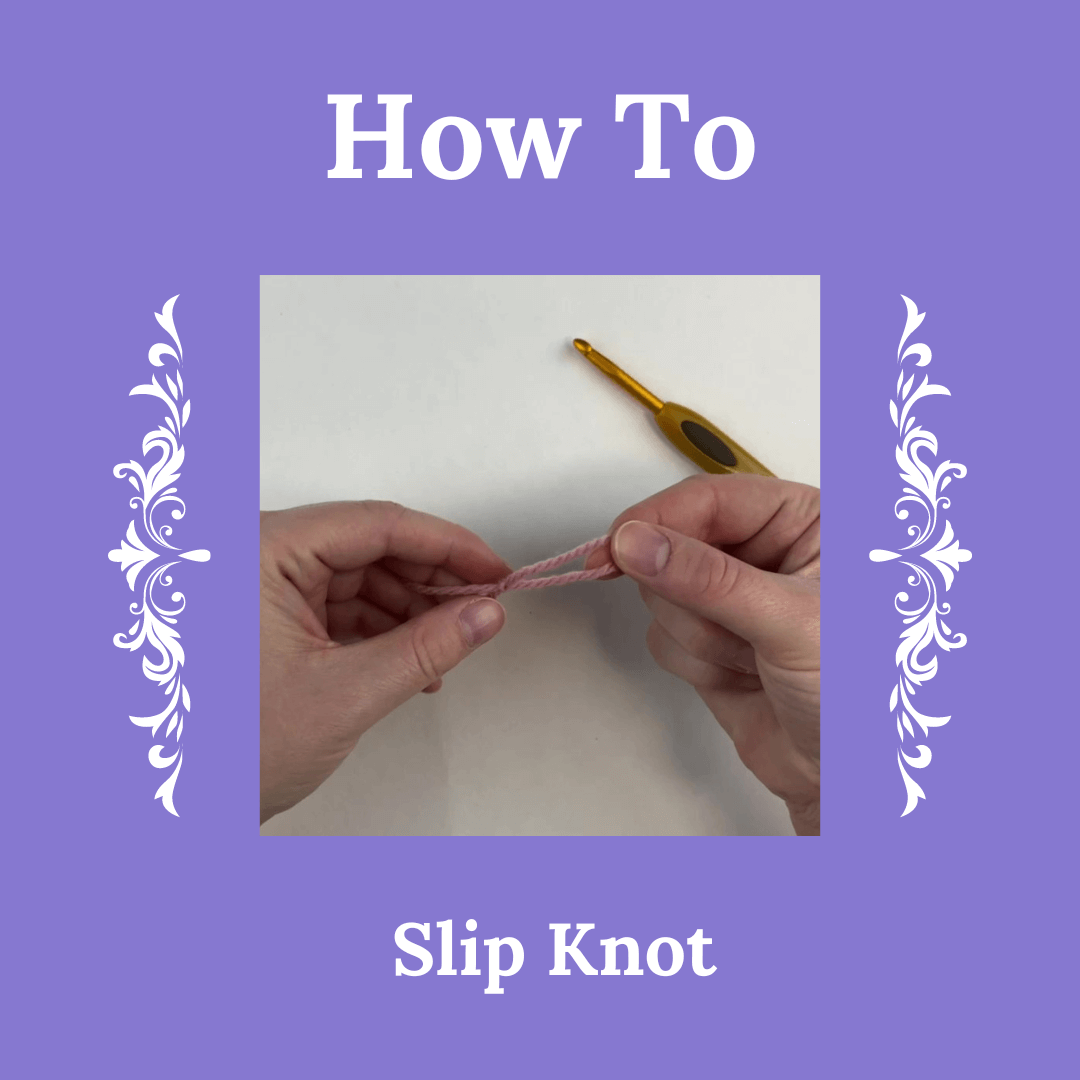
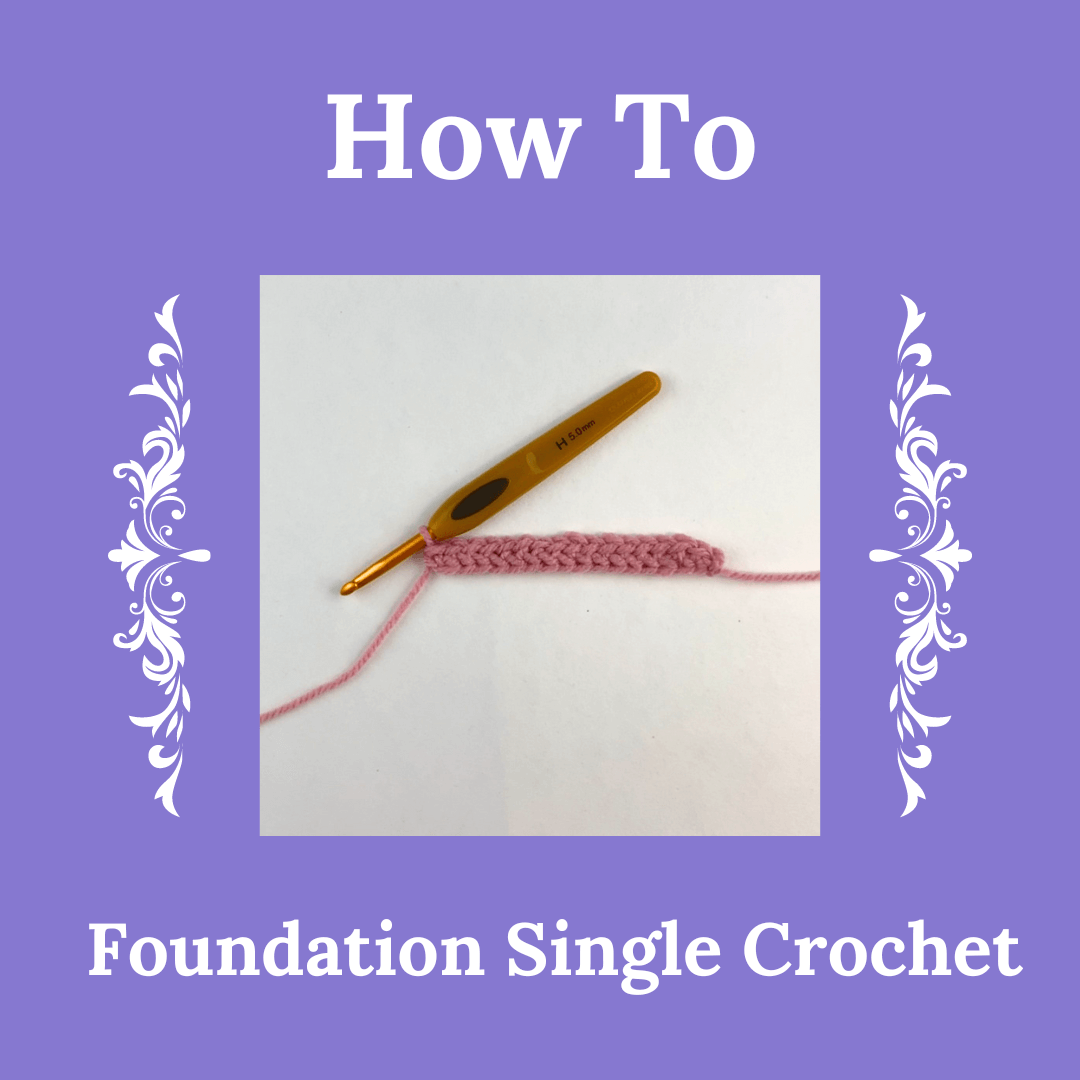
You may find these video tutorials handy whilst crocheting this pattern:
The Pattern
Materials
Yarn - Furls Wander Yarn (worsted weight) in:
Aurora - 59m/65yds
Dragonfruit - 31m/34yds
Agave - 74m/82yds
Wintermint - 32m/35yds
Bergamot - 107m/118yds
Crochet hook - 5mm/H-8 Furls Taurus Streamline Zodiac crochet hook
Stitch markers (optional)
Row counter (optional)
14 inch cushion pad
Sizing
Before insertion of the cushion pad, the cushion cover is 35.5cm (14 inch) square.
Gauge
A 10cm (4 inch) square requires 18 rows of 14 sc (plain panel).
A 10cm (4 inch) square requires 12.75 rows of 14 mosaic stitches (mosaic panel).
Abbreviations
rpt = repeat
st = stitch
rs = right side
ws = wrong side
ch = chain
sk = skip
sc = single crochet
fsc = foundation single crochet
dc = double crochet
slst = slip stitch
fo = fasten off
FLO = front loop only
BLO = back loop only
Difficulty level
Advanced beginner
Pattern Instructions
General Notes
I recommend that you read the entire pattern before starting to ensure that you understand what to do at each stage. If at any point you get stuck or would like clarification, please feel free to reach out to me – I am always happy to help! Information on how to contact me can be found at the end of the pattern.
All stitches are to be worked into both loops (unless otherwise specified).
Every row has 49st.
You can fo and weave in your ends at the end of each panel (or strategically hide most of them inside the cushion cover!).
Notes For The Plain Panels
Ch1 and turn at the end of every row. This does NOT count as a stitch.
A = dark green.
Notes For The Mosaic Panel
This panel is crocheted using the overlay mosaic crochet technique.
All rows are worked from right to left.
Row 1 is all sc.
All sc after row 1 are BLO (indicated by a square without a X in the chart) except for the first and last st of the row.
All dc (indicated by a square with a X in the chart) are FLO and worked into the st 2 rows down.
The yarn colour changes every row i.e. you should fo at the end of every row.
Ch1 at the start of every row. This does NOT count as a st.
B = light pink, C = dark pink.
There is a graph at the end of the mosaic section for those who prefer to work visually.
Front Panel – Plain Section 1
Rows 1 - 49fsc
Rows 2-17 (colour A) – 49sc
Row 18 (colour B) – 49sc
Front Panel - Mosaic Section
Row 1 (colour B) – 49sc
Row 2 (colour C) – sc, 47BLOsc, sc
Row 3 (colour B) – sc, 3FLOdc, 3BLOsc, 3FLOdc, 3BLOsc, 10 FLOdc, 3BLOsc, 10FLOdc, 3BLOsc, 3FLOdc, 3BLOsc, 3FLOdc, sc
Row 4 (colour C) – sc, 3BLOsc, 3FLOdc, 3BLOsc, 3FLOdc, 10 BLOsc, 3FLOdc, 10BLOsc, 3FLOdc, 3BLOsc, 3FLOdc, 3BLOsc, sc
Row 5 (colour B) – sc, 2FLOdc, 5BLOsc, 1FLOdc, 5BLOsc, 8FLOdc, 5BLOsc, 8FLOdc, 5BLOsc, 1FLOdc, 5BLOsc, 2FLOdc, sc
Row 6 (colour C) – sc, 2BLOsc, 5FLOdc, BLOsc, 5FLOdc, 8BLOsc, 5FLOdc, 8BLOsc, 5FLOdc, BLOsc, 5FLOdc, 2BLOsc, sc
Row 7 (colour B) – sc, FLOdc, 13BLOsc, 5FLOdc, 9BLOsc, 5FLOdc, 13BLOsc, FLOdc, sc
Row 8 (colour C) – sc, BLOsc, 13FLOdc, 5BLOsc, 9FLOdc, 5BLOsc, 13FLOdc, BLOsc, sc
Row 9 (colour B) – sc, FLOdc, 13BLOsc, 4FLOdc, 11BLOsc, 4FLOdc, 13BLOdc, FLOdc, sc
Row 10 (colour C) – sc, BLOsc, 13FLOdc, 4BLOsc, 11FLOdc, 4BLOsc, 13FLOdc, BLOsc, sc
Row 11 (colour B) – sc, FLOdc, 13BLOsc, 3FLOdc, 13BLOsc, 3FLOdc, 13BLOsc, FLOdc, sc
Row 12 (colour C) – sc, 2BLOsc, 11FLOdc, 4BLOsc, 13FLOdc, 4BLOsc, 11FLOdc, 2BLOsc, sc
Row 13 (colour B) – sc, 2FLOdc, 11BLOsc, 4FLOdc, 13BLOsc, 4FLOdc, 11BLOsc, 2FLOdc, sc
Row 14 (colour C) – sc, 3BLOsc, 9FLOdc, 5BLOsc, 13FLOdc, 5BLOsc, 9FLOdc, 3BLOsc, sc
Row 15 (colour B) – sc, 3FLOdc, 9BLOsc, 5FLOdc, 13BLOsc, 5FLOdc, 9BLOsc, 3FLOdc, sc
Row 16 (colour C) – sc, 5BLOsc, 5FLOdc, 8BLOsc, 5FLOdc, BLOsc, 5FLOdc, 8BLOsc, 5FLOdc, 5BLOsc, sc
Row 17 (colour B) – sc, 5FLOdc, 5BLOsc, 8FLOdc, 5BLOsc, FLOdc, 5BLOsc, 8FLOdc, 5BLOsc, 5FLOdc, sc
Row 18 (colour C) – sc, 6BLOsc, 3FLOdc, 10BLOsc, 3FLOdc, 3BLOsc, 3FLOdc, 10BLOsc, 3FLOdc, 6BLOsc, sc
Row 19 (colour B) – sc, 6FLOdc, 3BLOsc, 10FLOdc, 3BLOsc, 3FLOdc, 3 BLOsc, 10FLOdc, 3BLOsc, 6FLOdc, sc
Front Panel – Plain Section 2
Row 1 (colour B) – 49sc
Rows 2-18 (colour A) – 49sc
Back Panel
In the sample photographed I crocheted a second front panel (in different colours – the wintermint and bergamot). Alternatively, you can crochet a plain sc panel measuring 14 inch square, or create two overlapping panels for a button closure.
Joining Method
Prior to joining the panels together, I recommend crocheting a row of sc around each panel – this will make the joining process both easier and tidier. Place a sc into each sc along the top and bottom sides, and a sc into the side of each sc along the left and right sides of the panel. Add an additional sc (making a total of 3) into each corner stitch [49 st along the top and bottom, 55 st along the left and right sides, and 4 corner st].
Place you back panel down with the ws facing up, place the cushion pad on top, and then place the front panel with the rs facing up. Temporarily join your panels together using stitch markers. Place a sc into each st around to join – when forming each sc your hook should pass through the st on both front and back panels.
Fo and weave in your remaining ends.
Congratulations of making your Simply Love Mosaic Cushion Cover!
The fine print
©2023 Elimee Designs. All rights reserved.
You may sell the items that you crochet by following this pattern on a small scale provided that you credit Elimee Designs as the designer. Mass production is not permitted. This pattern or any of its parts may not be altered, reproduced, distributed, sold or translated without written permission from Elimee Designs. Copies can be made for personal use only.
Fancy grabbing your next Elimee Designs pattern for free? Kindly leave us a review on Etsy or Ravelry, and then email us with your order number and Ravelry/Etsy ID to be entered into our monthly free pattern giveaway. Good luck!
If you have any questions or suggestions regarding this pattern please feel free to contact us via hello@elimeedesigns.co.uk or our Elimee Designs Crochet Pattern group on Facebook.

Please use the hashtag #simplylovemosaic or #elimeedesigns, or tag me (@elimee_designs on Instagram or @elimeedesigns on Facebook) so that I can see your finished cushion cover too, and show it some much deserved love!
I’d like to take this opportunity to give some love to our fabulous crochet pattern tester who helped us to make this pattern just right.
Thank you Candy Sepanik Sanchez!

If you’d like to be notified when our next pattern goes into testing simply sign up below, or click HERE to learn more about becoming a crochet pattern tester.
I hope that you have enjoyed crocheting this pattern. Please feel free to leave your comments, suggestions and reviews below.
Looking for more content to explore? Check these out next!